Upgrading QuickBooks Desktop to WebConnector3.0
Table of Contents
Pre-Check
Before any steps are taken, it is important to make sure that the QuickBooks Admin user has access to the Web Apps Marketplace.
Right Networks
- Is the QuickBooks Desktop hosted on Right Networks? If no, continue to the pre-check steps. If yes, please connect with the Right Networks support team by phone or email to have them add the WebConnector 3.0 executable in the startup folder then run it once manually. This is necessary to allow QuickBooks Desktop and Biller Genie to connect using the QuickBooks Desktop WebConnector 3.0. Once this has been completed, move on to the pre-check steps below.
Servers (Not Right Networks)
- Click here to complete the server steps before moving on to the pre-check.
QuickBooks Desktop Update
- Open QuickBooks Desktop, before logging into the company file click “Help” at the top of the screen and then click “Update QuickBooks Desktop”. Click the “Update Now” tab, check the “Reset Update” box, and then click “Get Updates”. Once the Update Complete message appears, you need to close the QuickBooks software. Reopen QuickBooks Desktop, on the computer screen there may be a pop-up message to “install update”, click Yes”. Once the installation process has completed, restart the computer. QuickBooks Desktop is now updated to the latest version.
Pre-Check Steps
Step 1
Log into QuickBooks Desktop as the admin user in single user mode on the computer where the company file is stored.
Step 2
Once logged in, click the “File” menu in the upper left corner, from there click “App Management” towards the bottom, and then click “Manage Web Apps”.

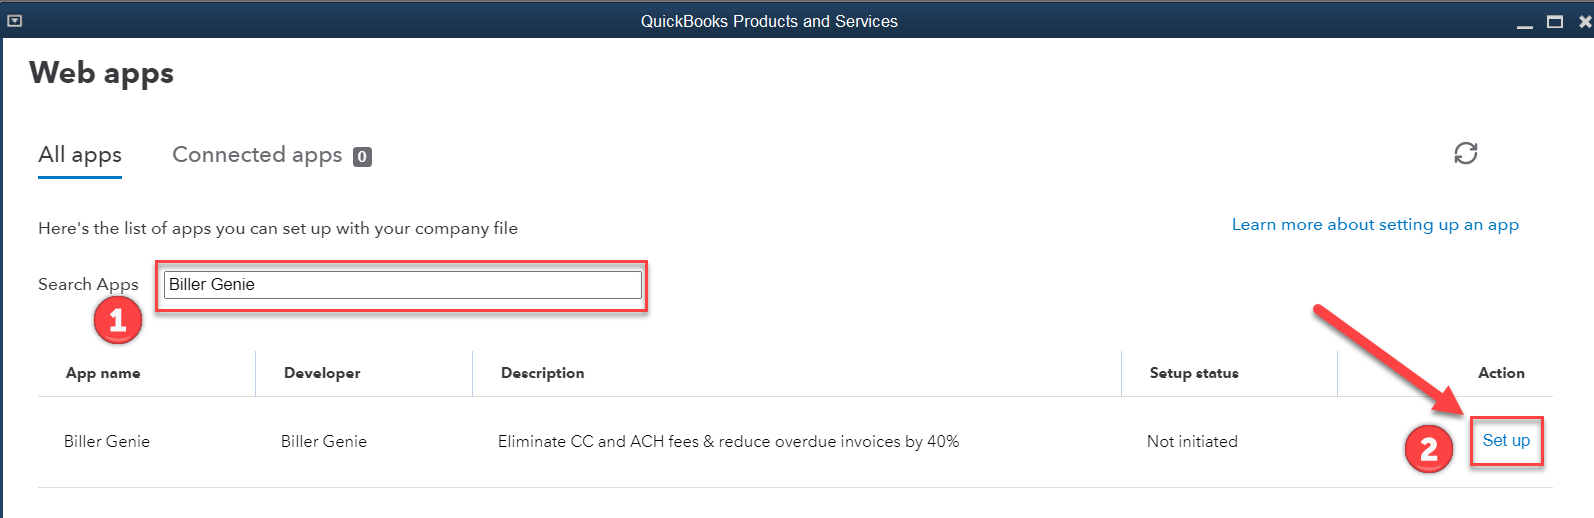
Step 3
Once the Web Apps opens, search for Biller Genie. Once the Biller Genie Web App is shown on the list, click the blue “Set Up” button on the right side.

Note: If the Web Apps marketplace does not appear and an Intuit login screen is shown, login with the Intuit account credentials. This means that there is no Intuit account associated with the QuickBooks Desktop Admin user. If It is not possible to log into the Web Apps Marketplace, please contact Inuit to ensure the Intuit account with primary admin access is connected to the QuickBooks Desktop admin user. Intuit account credentials are required to access the Web App Marketplace and setup the Biller Genie web app.
Step 4
Once the screen loads, if a prompt to log into Biller Genie appears, then the pre-check has passed and access to the Web App marketplace is available, and the Web Connector 3.0 is running.
Step 5
After seeing the Biller Genie login screen, proceed to the upgrade steps on the next page.
Upgrading the Biller Genie Sync Manager
Step 1
Log into the Biller Genie merchant portal.
Step 2
Click on Add-ons in the left side menu.
Step 3
Click on the QuickBooks Desktop add-on.
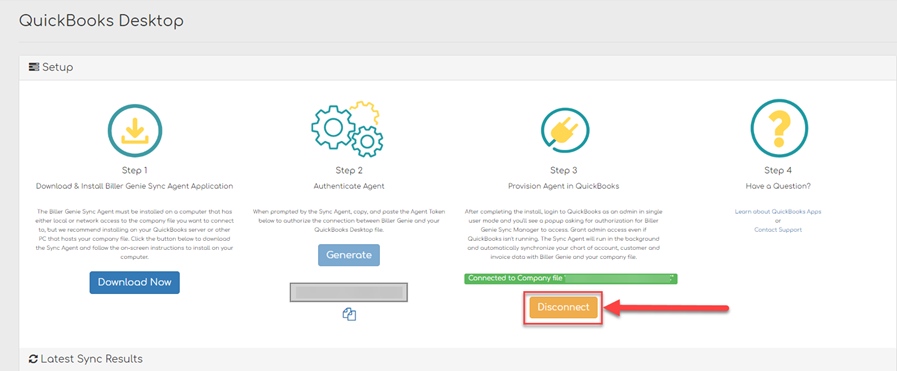
Step 4
Click the yellow Disconnect button under step 3 to disconnect from QuickBooks Desktop.
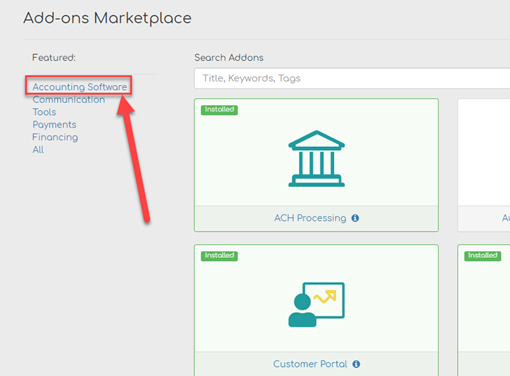
Step 5
Once the add-on is disconnected, it will need to be uninstalled. On the left side menu, click on Add-ons Marketplace, and then click Accounting Software from the featured list on the left.

Step 6
Click on the QuickBooks Desktop option that is highlighted in green and is labeled as installed.

Step 7
On the next screen, click Uninstall at the bottom right corner.

Step 8
After this is uninstalled, the new QuickBooks Desktop integration add-on will need to be installed. Head back to the Add-ons Marketplace by selecting it on the left side menu again.
Step 9
Click Accounting Software in the featured list on the left.
Step 10
Click QuickBooks Desktop Versions 2021 R4 and Later.

Step 11
Install the app.

Step 12
Once the app is installed in Biller Genie, log into QuickBooks Desktop as the admin user in single user mode on the computer where the company file is stored.
See Appendix A which shows how to confirm single-user mode is being used.
Step 13
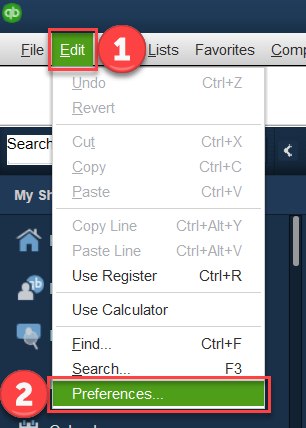
In QuickBooks Desktop click “Edit” on the top menu, then click preferences.
The preferences dialog box will open, click “Integrated Applications” on the left side menu and then click the “Company Preferences” tab at the top of the dialog box.
Step 14
The preferences dialog box will open, click “Integrated Applications” on the left side menu and then click the “Company Preferences” tab at the top of the dialog box.
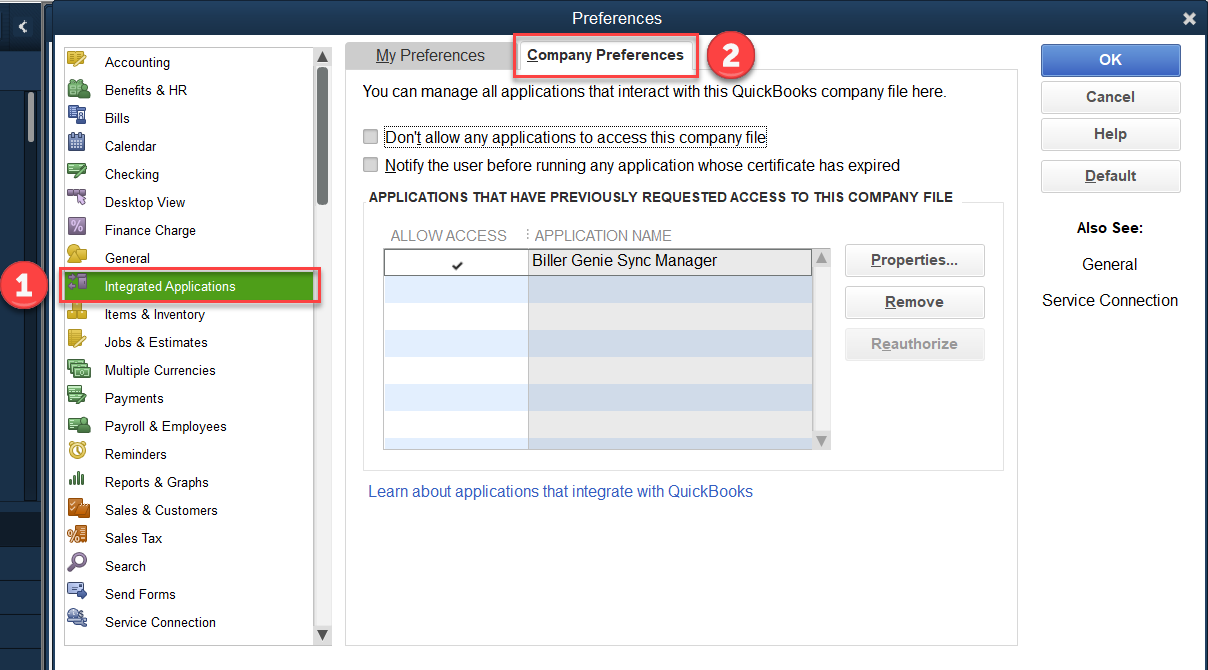
Step 15
Click once on the “Biller Genie Sync Manager” to select it, and then click “Remove”.
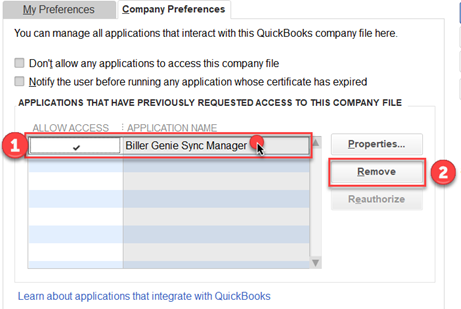
Step 16
A dialog box will pop asking to confirm the removal of the Biller Genie Sync Manager application. Click “Yes”.

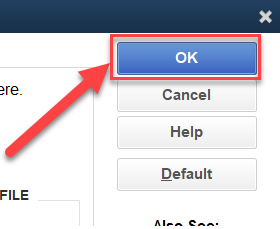
Step 17
The Biller Genie Sync Manager will now be removed from the application list in the company preferences. Click the blue “OK” button in the upper right corner to exit the preferences menu.
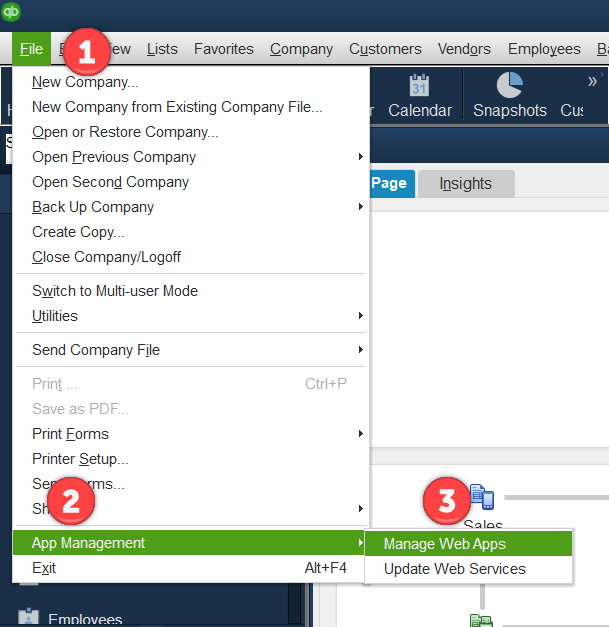
Step 18
In QuickBooks Desktop click the “File” menu in the upper left corner, from there click “App Management” towards the bottom, and then click “Manage Web Apps”.
Step 19
Now that the “Web Apps” screen is open, in the search apps field, type Biller Genie. Once the Biller Genie Web app is shown on the list, click “Set Up” on the right side.
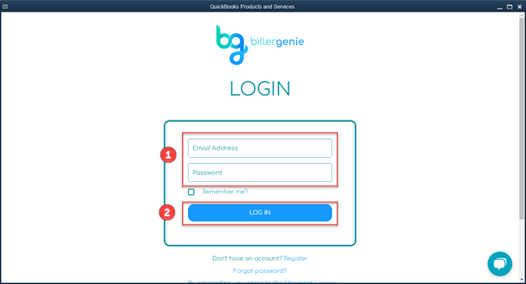
Step 20
Once the screen loads, a prompt to log into Biller Genie appears. Enter the Biller Genie merchant portal credentials and click “Log In”.
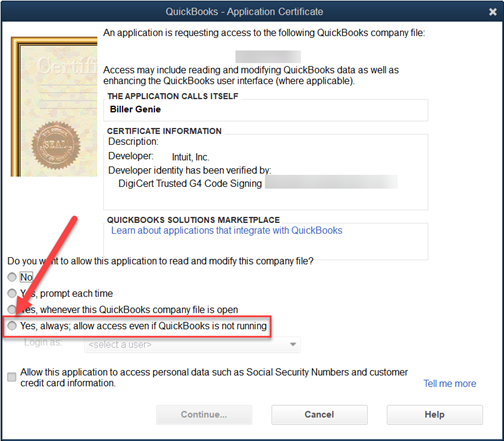
Step 21
Once successfully logged in, QuickBooks will prompt an Application Certificate dialog box. Under “Do you want to allow this application to read and modify this company file?” check the last option “Yes, always; allow access even if QuickBooks is not running”.
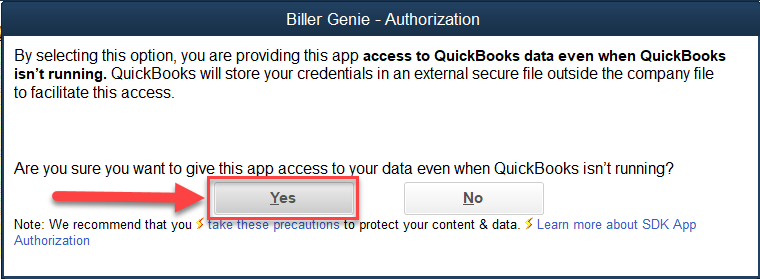
Step 22
After checking the box in step 10, a “Biller Genie – Authorization” dialog box will open. Click yes.
Step 23
After clicking yes in step 11, the “Application Certificate” dialog box will be open again. Click the drop down under “Login as” and choose the admin user. Then click continue.
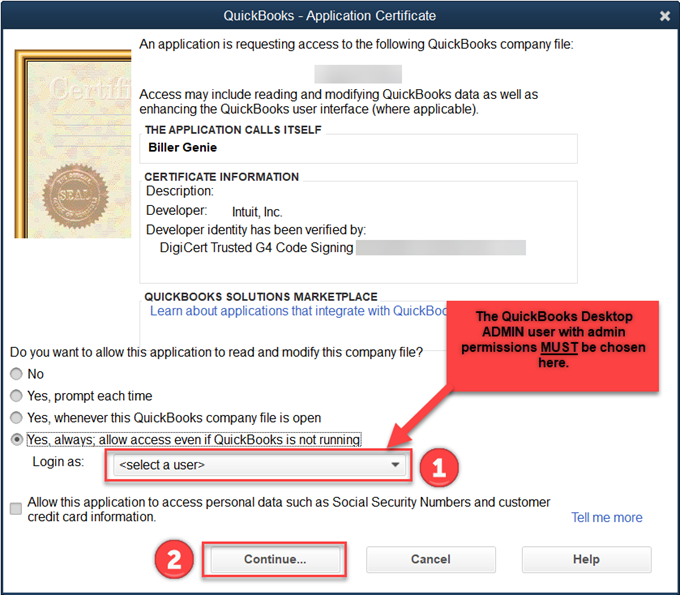
Step 24
After clicking continue in step 12, a “Access Confirmation” dialog box will open. Click done.
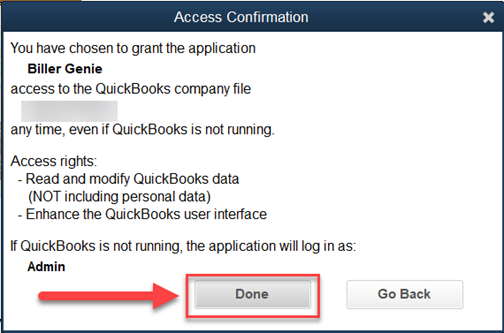
Step 25
After clicking done in step 13, the Biller Genie web app will load with the configured settings.

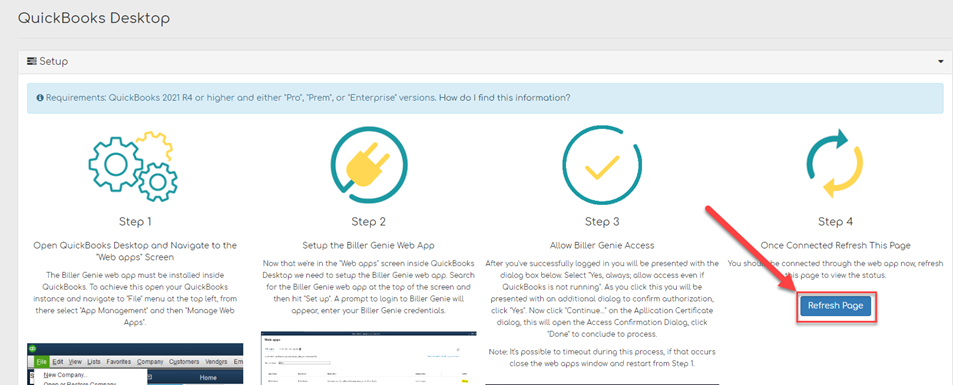
Note: It’s possible to timeout during the loading process. If that occurs, close the web apps window and restart from step 7.

Step 26
Go back to the Biller Genie merchant portal. The QuickBooks Desktop Add-on should still be on the screen. If it isn’t, click Add-ons on the left side menu, then choose QuickBooks Desktop. Click refresh on step 4.
Step 27
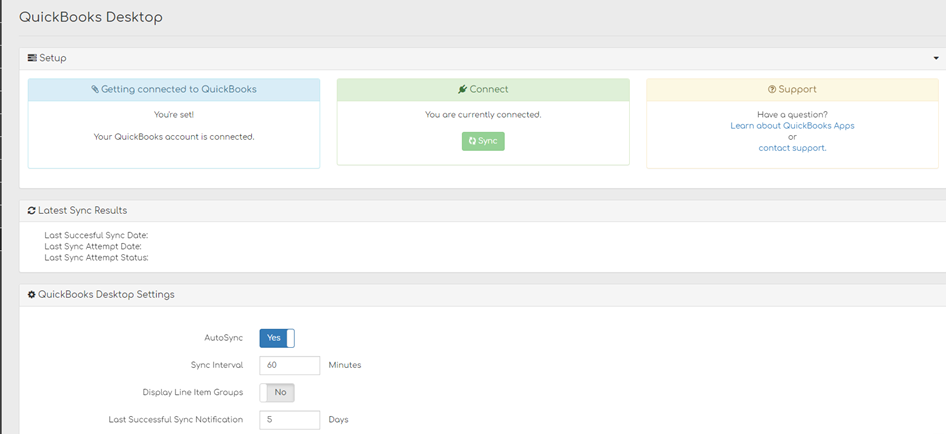
After clicking refresh in step 15, the screen will update, and Biller Genie will be attempting to sync with QuickBooks Desktop for the first time with the new add-on.
Step 28
Make sure to uninstall the Biller Genie Sync Manager application on your computer as the new add-on now requires it.
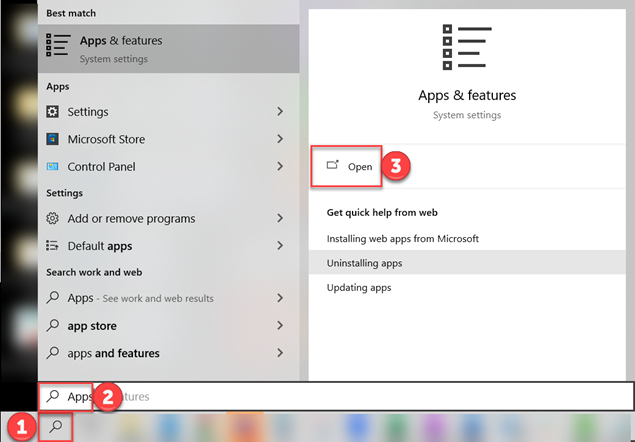
Step 29
On most computers click the search/magnifying glass icon on the task bar. Then type “Apps” in the search field and the “Apps & features” system settings option will then appear, click “Open”.
Step 30
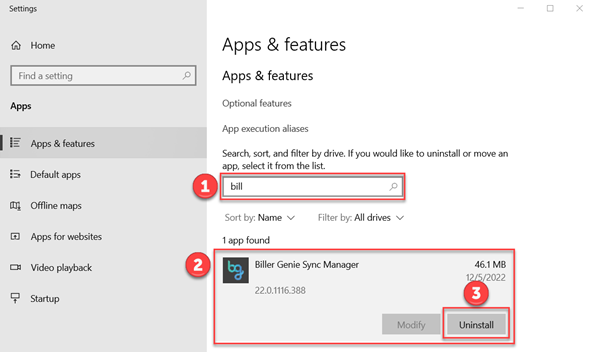
The Apps & features dialog box opens. In the search field type “Bill” and the Biller Genie Sync Manager app will appear. Click on it to show options and then click “Uninstall”.
Step 31
After clicking “Uninstall”, a small confirmation dialog box will open. Click “Uninstall”.
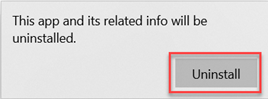
Step 32
The Biller Genie Sync Manager will then be removed from the computer.
Step 33
If you have a single Biller Genie account connected to a single company file, you are finished. If you have multiple Biller Genie accounts connecting to multiple company files stored on the same QuickBooks Desktop instance on the same computer, please continue to the next steps.
Multifile Additional Steps
Step 34
Return to the first Biller Genie merchant portal that has been connected and navigate to the new QuickBooks Desktop add-on. Click Add-ons on the left side menu and click QuickBooks Desktop.
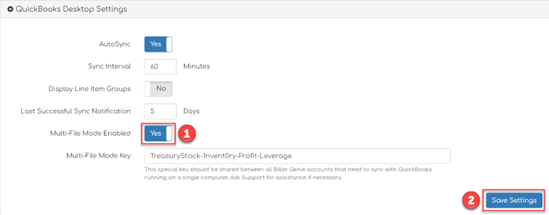
Step 35
Scroll down to the “QuickBooks Desktop Settings” section. To the right of the Multi-File Mode Enabled setting, click on the toggle to change it from No to Yes, then click Save Settings in the bottom right.
Step 36
When updating the additional Biller Genie accounts and respective company files stored on the same computer, please repeat steps #2 - #27 for each account and file.
Step 37
Once step #27 is completed for each Biller Genie account and the QuickBooks Desktop company file for each has synced, return to the first Biller Genie account that was connected. Navigate to the new QuickBooks Desktop add-on. Scroll down to the “QuickBooks Desktop Settings” section. Highlight, right click, and copy the key to the right of the Multi-File Mode Key setting.
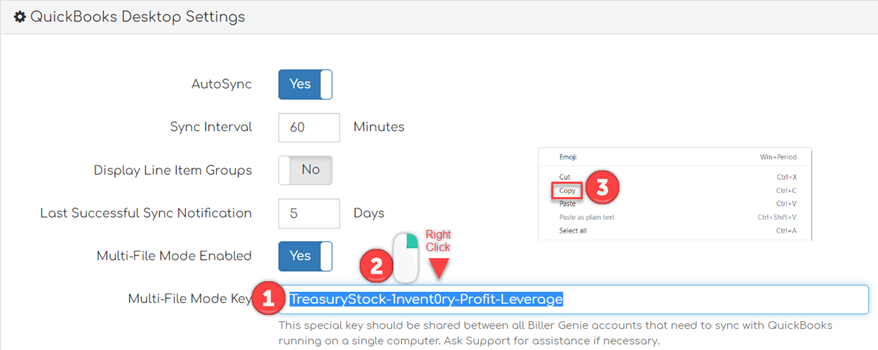
Step 38
Navigate to each of the other Biller Genie accounts and proceed to the QuickBooks Desktop add-on. Scroll down to the “QuickBooks Desktop Settings” section. Enable Multi-File Mode Enabled by toggling from No to Yes. Highlight and delete the existing Multi-File key. Then paste the copied key from the first connected Biller Genie account by right clicking in the empty Multi-File Key field then select paste. Click Save Settings in the bottom right to save the new key.
s
Step 39
After step #38 is completed for each connected Biller Genie account, the process is complete. It is critical to make sure that each of the Biller Genie accounts connected to different company files on the same QuickBooks Desktop instance on the same computer all have the same Multi-File Key. If they do not, the company files will not be able to autosync.
Appendix A
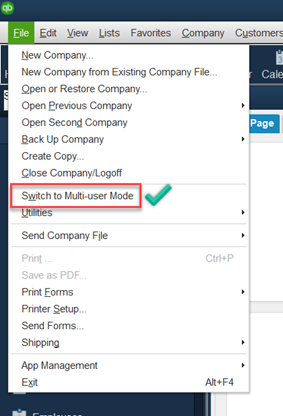
1. How to know your QuickBooks Desktop is signed in as single-user mode.
- In QuickBooks Desktop, click the “File” menu in the upper left corner. Once the file menu opens mid-way down the menu it will show “Switch to Multi-user Mode”. This means the company file is signed in as single-user mode which is what is needed to get the Biller Genie web app set up.
2. How to switch from multi-user mode to single-user mode in QuickBooks Desktop.
- In QuickBooks Desktop, click the “File” menu in the upper left corner. Once the file menu opens mid-way down the menu click “Switch to Single-user Mode”.
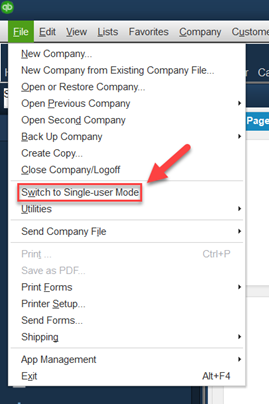
- Once the switch is competed, QuickBooks will acknowledge this with a dialogue box. Click ok and the company file will be signed in as single-user mode.

Server Steps for QuickBooks Desktop WebConnector 3.0
If the QuickBooks company file is stored a server, the WebConnector executable file needs to be in the computer’s startup to run automatically allowing Biller Genie to connect to QuickBooks Desktop. The specific file that needs to run on startup is called Intuit.QBDT.WebConnector.Application.exe.
This file is most likely located in one of two locations:
- C:\ProgramFiles(x86)\CommonFiles\Intuit\QuickBooks\QBWebConnector3.0
- C:\Program Files (x86)\CommonFiles\Intuit\QuickBooks\WebConnector3.0
Locate the WebConnector executable file and note which path the file is located in as it will be needed for a step below.
Steps to add the startup folder as a shortcut
Step 1
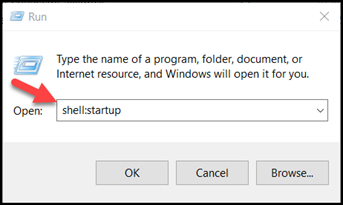
Open the Windows “Run” dialog box which can be done multiple ways.
- Click on the Windows start menu and search for "Run" or use the search button next to the start menu and open the dialog box.
- Right click on the Windows start button and then click “Run” to open the dialog box.
- Press the "Windows key + R" to open the Run dialog box.
Step 2
Once the “Run” dialog box is open, type or copy & paste "shell:startup" in the “Open:” field and press enter. This will open the Startup folder for the current user. Click “OK” to proceed.
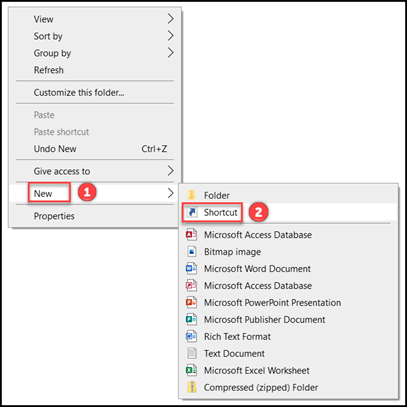
Step 3
In the Startup folder, right-click and select "New" and then click "Shortcut".
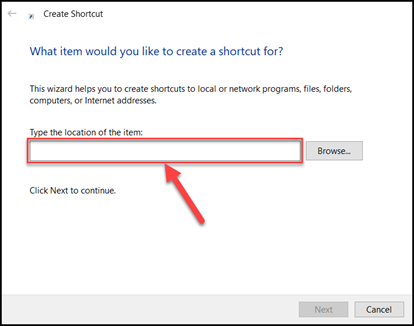
Step 4
In the "Create Shortcut" window, copy and paste the file path where the WebConnector executable file was located into the empty field. Use the below provided correct path as the executable file has been added to the end of it.
- C:\Program Files (x86)\Common Files\Intuit\QuickBooks\QBWebConnector3.0\Intuit.QBDT.WebConnector.Application.exe
- C:\Program Files (x86)\Common Files\Intuit\QuickBooks\WebConnector3.0\Intuit.QBDT.WebConnector.Application.exe
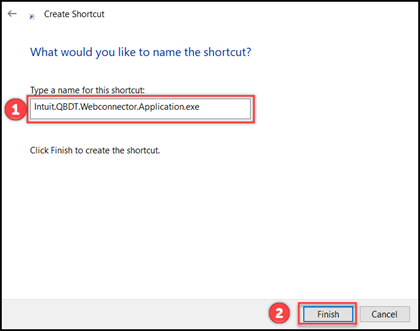
Step 5
Click "Next" and give the shortcut a name, such as "Intuit.QBDT.Webconnector.Application.exe" and then click finish.
Step 6
Please double-click the shortcut to run it once so that a reboot is not required immediately to get it to work. Once the shortcut is created, the QuickBooks WebConnector 3.0 process will run automatically on startup, allowing QuickBooks Desktop to connect to Biller Genie for the first sync and subsequent syncs.
Step 7
Return back to the pre-check and continue.